Synchronous Multiplayer
Synchronous multiplayer is when players join the same server room and experience the game together in real time such as a racing game or death match.
Requirements
Synchronous multiplayer will not work unless you make sure the ExperienceInfo.json file in your Unity project root folder is using the development keys for an Experience you created in the workshop portal. This is true for cloned projects as well. See Create a New Experience if you need to create new keys.
Smart Fox Server
Genies SDK uses Smart Fox Server or (SFS) for the Multiplayer framework. This is used for local testing in Unity and also for the deployed Experience in the app.
Smart Fox Server Documentation
The Smart Fox Server SDK has its own documentation site with APIs, explanations, and tutorials of its multiplayer frameworks.
Here are some important links in the SFS documentation:
Setting Up Smart Fox for Local Development
In Unity, under Genies > Multiplayer, you'll be able to find the Settings window. If you haven't previously installed the SFS2XLauncher for Smart Fox to test locally, you will see a button to install the application.
Server Folders
There are two main folders in the Unity project that contain important server information.
Server Data Folder
In the Unity project under the Assets folder, the Assets > Experience > Server folder contains the Game Schema data. This data is used to configure the server with specific properties.
In addition, you will find the ServerConfig.json file that is used to point to specific server-side modules being used.
This folder should not be moved. The three files inside this folder should not be duplicated or renamed either; however, it is fine to edit the contents inside each file.
Server Code Folder
In the Unity project folder, the Server folder contains the server code that needs to be synced and validated if changed using the Multiplayer window. This includes custom server modules.
Read the Client-Server Communication page for more information on using server modules.
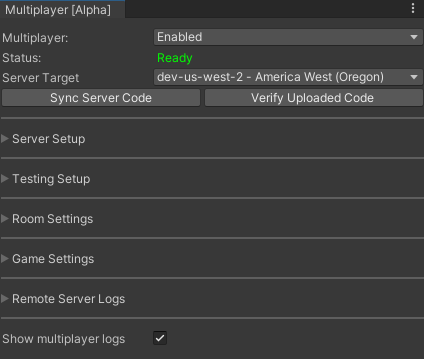
Multiplayer Window
The Multiplayer window has properties and tools for developers to enable multiplayer, launch additional test client instances, and see server logs.
You can open the Multiplayer window by selecting the top dropdown menu Genies > Multiplayer.
You can also open the Multiplayer window with the shortcut Ctrl + Shift + M (Windows) or Cmd + Shift + M (Mac).
Server Target
The Server Target is the type of server you want the Experience to connect.
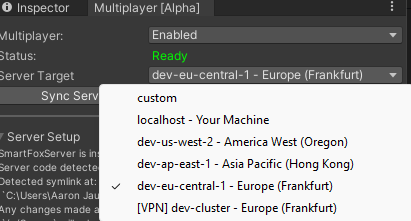
The localhost - Your Machine option is the quickest option for testing on your local device; however, in order for the project to build for the app then it needs to be one of the non-local options (excluding custom and VPN dev-cluster).
Sync and Verify Server Code Buttons
When using a non-local server target, it is required to sync the server code and then verify it using the buttons below the Server Target dropdown menu. This will ensure the remote server you are testing on has the updated server code including any custom server modules.
If using the localhost server target, the server code will automatically get synced and verified based on the contents of the Server folder.
Server Setup
This section has information about where the server code is installed and if there is any updates available.
Within this section, there is the Open Server Folder button - giving you direct access to see the contents of your Server Folder with the server-side modules that are available or that you've created.
In addition, if you find your server-side code isn't properly updating with changes you have made, you can use the Force Compile button to make sure the dist folder in your Server folder updates.
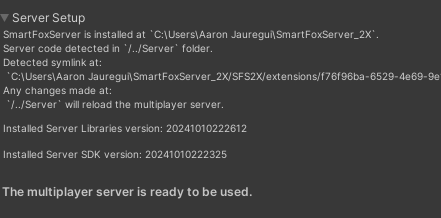
The Update Server Code and Update Server Libraries buttons will update the server folders from the cloud. This will reset the Game Schema JSON files and server module files so press the buttons with caution.
Custom Modules
In this section, you can create and keep track of the custom modules you generate. These modules automatically create a path in the ServerConfig.json file whenever a new module is added here.
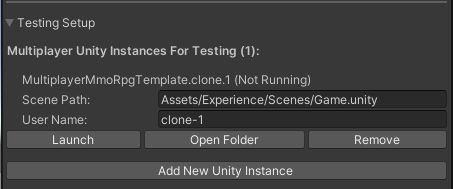
Testing Setup
This section has options for creating, modifying, and deleting extra Unity instances for testing multiple clients on your local device.
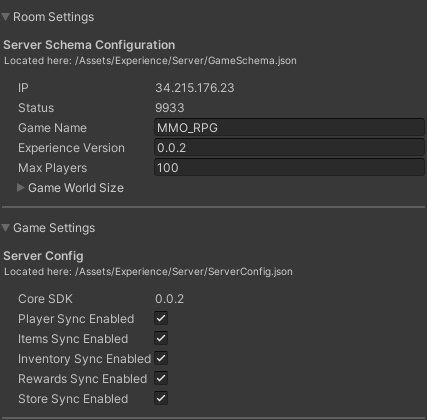
Room and Game Settings
The room and game settings are options saved in the Game Schema JSON files.
Remote Server Logs
Here you can see the server log messages by clicking the Download Remote Server Logs button and then the Open Logs button.

The Remote Server Logs are not available when using the localhost Server Target. The Smart Fox Server terminal window will display local server logs.
Core Multiplayer Components
In Unity, there are three main components that make up a multiplayer Experience: Game Schema, Network Managers, and Factories.
Game Schema
The Game Schema is a Scriptable Object that handles all the client to server establishment. It is located in the Assets > Experience > Server folder.
It contains two JSON files:
- GameSchema.json - contains all of the information required to create a new server room.
- ServerConfig.json - contains game specific data that both client and server share.

The ServerConfig.json file is important for adding custom server module scripts.
Read the Client-Server Communication page for more information on adding custom server code.
Network Managers
The Network Manager is the singleton that holds connection configuration and is the main access point as a service discovery for all other network managers. They usually contain the different lifecycle event listeners like if a player joins the server.
Here is a list of important network managers:
- NetworkLoginManager - the manager responsible for player authentication and joining the experience.
- NetworkEventManager - handles any events triggered or listened to from the client and server.
- NetworkPlayerManager - handles player and NPC sync.
- NetworkItemManager - handles item sync such as an obstacle, collectable, or other visual elements.

The NetworkManager prefab has all the necessary managers and factories setup to work as is and is located in the Packages > Genies Multiplayer > Runtime > Prefabs folder. It is recommended to use that for multiplayer Experiences.
Factories
A factory is a component that produces local and remote visual objects. They are responsible for creating networked objects on all client sessions like player Avatars or NPCs.
Here is a list of important factory types:
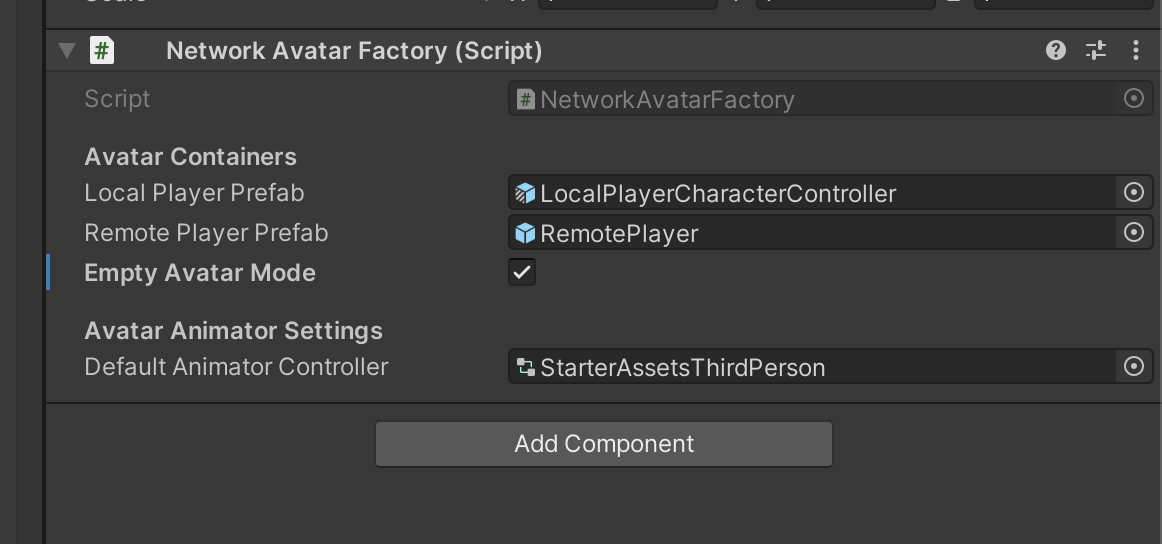
- NetworkAvatarFactory - creates a player Avatar for the local client and remote clients.
- NetworkItemFactory - creates an item for the local client and remote clients.