Multiplayer Tutorial
This tutorial will cover the basic setup of synchronous multiplayer in an Experience including networked players, networked items, collision, and client to server communication.
Read the synchronous multiplayer page for more information.
Overview
This tutorial's end result will have networked Avatars spawning in that can move with input. Users can also spawn and delete cubes that follow them. The cubes will also change color if colliding with a player.
Initial Setup
The first step is to create a new scene with multiplayer enabled.
Create a New Scene
Open a Unity project that contains the Genies SDK and create a new scene.
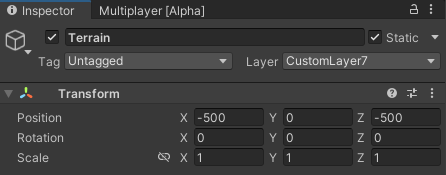
Add Terrain
Add a new default Terrain object. Set the Position to X: -500, Y: 0, Z: -500. Set the Layer to CustomLayer7.
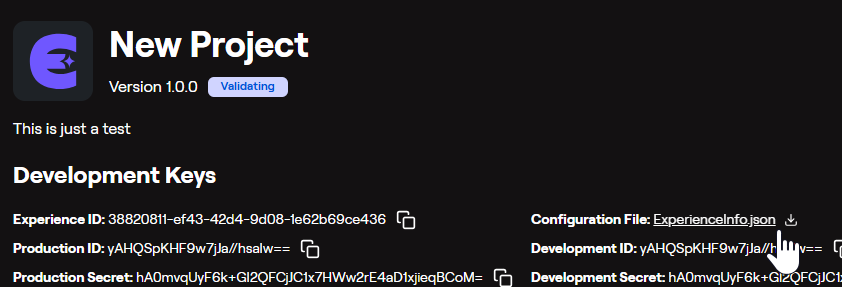
Add the Experience Info
Open the ExperienceInfo.json file in the root Unity project folder. Make sure the Development Keys there is the same as the Configuration File in the Genies Hub Portal.
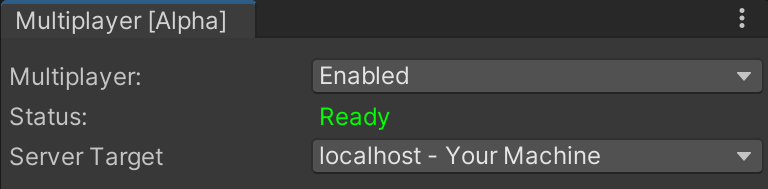
Enable Multiplayer
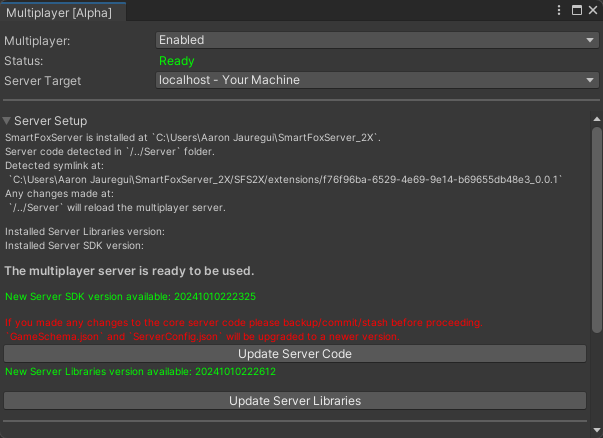
Open the Unity project for the Experience that you wish to add multiplayer. Open the Multiplayer window by selecting the top dropdown menu Windows > Multiplayer. Then select the Enable option for the Multiplayer property. Set the Server Target option to localhost.
You may be required to click Download Latest Server Code button before being able to enable multiplayer. You may also need to restart Unity if the Server Targets are stuck loading.
Update Server Versions
If the Multiplayer windows shows a new server version is available, make sure to click Update Server Code and Update Server Libraries buttons.
Add the Network Manager Prefab
In the Project window, open the Packages > Genies Multiplayer > Runtime > Prefabs folder. Add the NetworkManager prefab to the Hierarchy window.

Add the Genies SDK Prefab
In the Project window, open the Packages > Genies Experience Sdk > Runtime > Prefabs > Resources folder. Add the GeniesExperienceSDK prefab to the Hierarchy window.

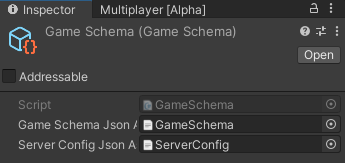
Add the JSON Files
Select the Game Schema scriptable object in the Assets > Experience > Server folder. Open the Inspector window, then drag and drop the two JSON files in the same folder into the appropriate property fields.
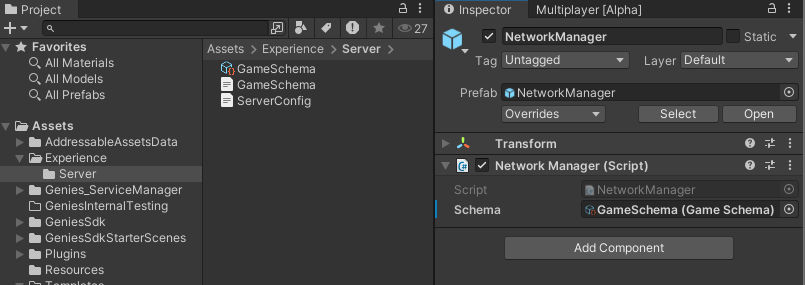
Add the Game Schema
Select the newly added NetworkManager object and open the Inspector window. Drag and drop the GameSchema asset from the Assets > Experience > Server folder into the Game Schema property.
Configure the Player Prefabs
The next step is to set the local and remote player prefabs.
Create the Local Player Prefab
Open the Packages > Genies Multiplayer > Runtime > Prefabs > Player folder and copy the LocalPlayerCharacterController prefab. Paste a duplicate into the Assets > Experience folder and rename it to LocalPlayer.

You can copy a selected asset with Ctrl + C (Windows) or Cmd + C (Mac) and paste a duplicate into a selected folder with Ctrl + V (Windows) or Cmd + V (Mac).
Set the Ground Layer
Select the LocalPlayer prefab and open the Inspector window. Set the Ground Layers property to CustomLayer7 (the same as the Terrain layer).

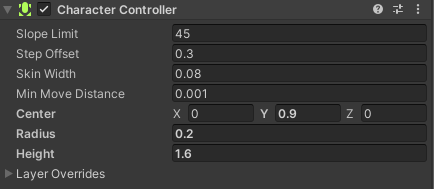
Set the Character Controller
Next, set the following properties in the Character Controller component of the LocalPlayer prefab:
- Set the Center property to X:
0, Y:0.9, Z:0. - Set the Radius property to
0.2. - Set the Height property to
1.6.
Add the Player Prefabs
Select the NetworkAvatarFactory object in the Hierarchy and open the Inspector window. Add the duplicated LocalPlayer prefab and the RemotePlayer prefab from the Assets > GeniesSdk > Prefabs > Player folder.
![]()
Test the Project
Enter Play mode. The Avatar should eventually be loaded in.
![]()
If it doesn't work then check the Multiplayer FAQ for a possible solution.
Launch a Second Client
In order to see how this is a multiplayer Experience, it is required to have at least two clients join a game server.
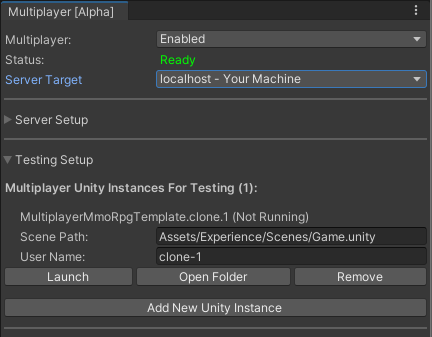
Create and Launch a new Unity Instance
Open the Multiplayer window and select the Add New Unity Instance button in the Testing Setup section. Click the Launch button once the Unity instance has been added.
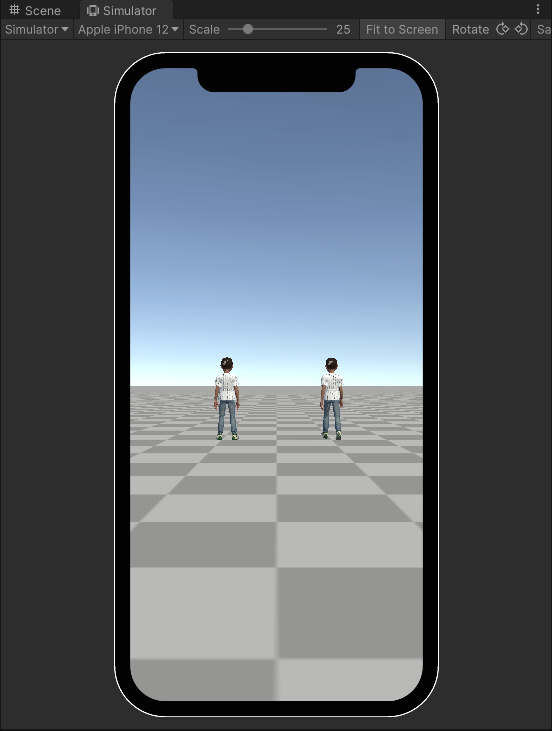
Test the Projects
Once the new Unity instance is loaded, enter Play mode on both instances. There should be two Avatars visible for both Unity instances.
You may need to manually move one of the Avatars in the scene to see them both simultaneously.
Configure Player Input
The local players will move based on input from a joystick UI. They will also need a script to keep the local and remote players on the terrain at all times.
Add the Input UI
Open the Packages > Genies ThirdParty CharacterControllers > Runtime > StarterAssets > Genies folder and add the Custom_TouchZones prefab to the Hierarchy.

Disable the Look Input
For this project, the Look Input will be disabled so the camera cannot rotate. Expand the Custom_TouchZones parent object in the Hierarchy and disable the UI_Virtual_TouchZone_Look child object.

Create a Game Controller Script
In the Project window, right click in the Assets > Experience folder and select GENIES > Create Scripts > Create Genies Behaviour Script. Rename the script to GameController.
Open the script and add this code:
import { Camera, Collider, MonoBehaviour, Ray, Vector3 } from "UnityEngine";
import { NetworkPlayerManager, Utility } from "Genies.Multiplayer";
import { NetworkPlayer, PlayerNetworkTransform } from "Genies.Multiplayer.Player";
import { Vec3D } from "Sfs2X.Entities.Data";
import { RemoteTransformController } from "Genies.Multiplayer.Sync";
import { StarterAssetsInputs, UICanvasControllerInput } from "StarterAssets";

export default class GameController extends MonoBehaviour {
    public uiCanvasControllerInput: UICanvasControllerInput;
    public playerManager: NetworkPlayerManager;
    public terrainCollider: Collider;

    private Awake() : void {
        this.playerManager.OnLocalPlayerCreated.AddListener(this.OnLocalPlayerLoaded);
        this.playerManager.OnRemotePlayerCreated.AddListener(this.OnRemotePlayerCreated);
        this.playerManager.OnRemotePlayerUpdated.AddListener(this.OnRemotePlayerUpdated);
    }

    private OnLocalPlayerLoaded(player: NetworkPlayer): void {
        Camera.main.transform.parent = player.transform;
        this.uiCanvasControllerInput.starterAssetsInputs = player.GetComponent<StarterAssetsInputs>();
    }

    private OnRemotePlayerCreated(player: NetworkPlayer) {
        // Adjust the Y position on entry to make sure players don't fall through the terrain
        let entryPoint = player.User.AOIEntryPoint.ToVector3();
        let adjustedY: float = this.GetTerrainHeight(entryPoint);
        let newEntryPoint: Vec3D = new Vec3D(entryPoint.x, adjustedY, entryPoint.z);
        player.User.AOIEntryPoint = newEntryPoint;
    }

    private OnRemotePlayerUpdated(player: NetworkPlayer) {
        let transformController = player.GetBehaviour<PlayerNetworkTransform>();
        let remoteTransformController: RemoteTransformController = transformController.RemoteController;
        let position = remoteTransformController.TargetPosition;
        // Adjust the Y position on update to make sure players don't fall through the terrain
        position.y = this.GetTerrainHeight(position);
        remoteTransformController.SetPosition(position, true);
    }

    private GetTerrainHeight(position: Vector3): float {
        const maxHeight: float = 10;
        const currentPositionY: float = position.y;
        position.y = maxHeight;
        const ray: Ray = new Ray(position, Vector3.down);
        let result = Utility.Raycast(this.terrainCollider, ray, 2.0 * maxHeight);
        if (result.Success) {
            return result.Hit.point.y;
        } else {
            return currentPositionY;
        }
    }
}
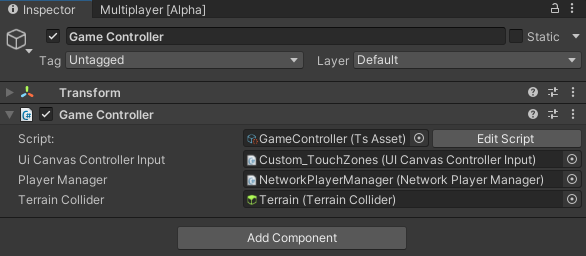
Create a Game Controller Object
Create a new empty Game Object and rename it Game Controller. Then add the GameController script as a component. Add the following property references:
- The Custom_TouchZones object
- The NetworkPlayerManager object
- The Terrain object
Add an Event System
If the Hierarchy doesn't have one already, then create a new UI > Event System object.

Test the Project
The local Avatar should move and animate for all clients when using the UI joystick.
The remote player animations are currently not working but the bug is being investigated.
Create a Networked Item
The next section will show how to create a networked cube that follows the player.
Create a New Cube
Create a new 3D Cube object. Select it and open the Inspector.
- Set the Scale property to X:
0.5, Y:0.5, Z:0.5. - Activate the Box Collider's Is Trigger property.
- Create a new yellow material and add it to the cube.
Then move the Cube object to the Project window so it becomes a prefab and delete it from the scene.

Create a Cube Controller Script
In the Project window, right click in the Assets > Experience folder and select GENIES > Scripts > Create Genies Behaviour Script. Rename the script to CubeController.
Open the script and add this code:
import {MonoBehaviour, Transform, Vector3} from "UnityEngine";

export default class CubeController extends MonoBehaviour {
    public smoothingSpeed: float = 0.02;

    private _cachedTransform: Transform;
    private _targetTransform: Transform;
    private _distanceBehind: float;
    private _heightOffset: float;

    private Awake() {
        this._cachedTransform = this.transform;
    }

    public SetTarget(targetTransform: Transform, distanceBehind: float, heightOffset: float) {
        this._targetTransform = targetTransform;
        this._distanceBehind = distanceBehind;
        this._heightOffset = heightOffset;
    }

    private Update() {
        if (this._targetTransform == null) return;

        let targetPosition: Vector3 = this._targetTransform.position -
            ((this._targetTransform.forward * this._distanceBehind) as Vector3) +
            ((Vector3.up * this._heightOffset) as Vector3);

        this._cachedTransform.position = Vector3.Lerp(this._cachedTransform.position, targetPosition, this.smoothingSpeed);
        this._cachedTransform.LookAt(this._targetTransform);
    }
}
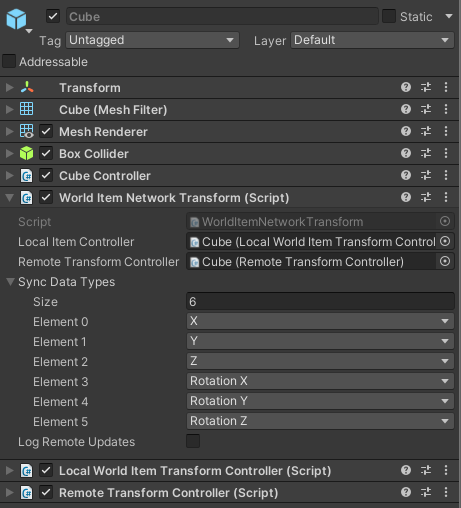
Add the Cube Scripts
Select the Cube prefab and open the Inspector window. Add the following components:
- CubeController script
- WorldItemNetworkTransform script
- LocalWorldItemTransformController script
- RemoteTransformController script
Then set the following properties in the WorldItemNetworkTransform script:
- Set a reference to the LocalWorldItemTransformController script
- Set a reference to the RemoteTransformController script
- Add 6 Sync Data Types for the position and rotation
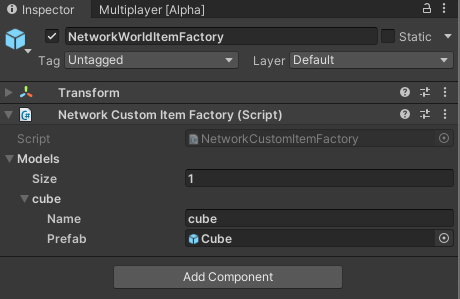
Reference the Cube
Select the NetworkCustomItemFactory object in the Hierarchy and open the Inspector window. Add a reference to the Cube prefab.
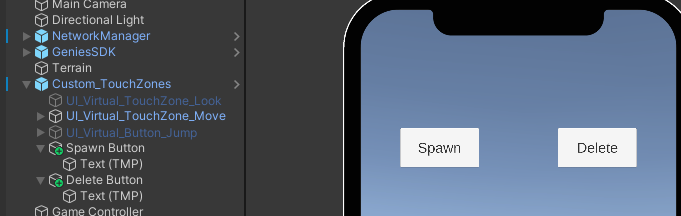
Create UI Buttons
Create two new UI Buttons for spawning and deleting the networked item. Name them Spawn Button and Delete Button.
Change the Game Controller Script
The Game Controller script will spawn and delete the networked Cube prefab when the player presses the buttons.
Open the GameController script and add the highlighted code:
import { Camera, Collider, GameObject, MonoBehaviour, Ray, Vector3 } from "UnityEngine";
import { NetworkItemManager, NetworkPlayerManager, Utility } from "Genies.Multiplayer";
import { NetworkPlayer, PlayerNetworkTransform } from "Genies.Multiplayer.Player";
import { Vec3D } from "Sfs2X.Entities.Data";
import { RemoteTransformController } from "Genies.Multiplayer.Sync";
import {StarterAssetsInputs, UICanvasControllerInput} from "StarterAssets";
import { ItemControlType, NetworkWorldItem, NetworkItem } from "Genies.Multiplayer.Item";
import CubeController from "./CubeController";
import { Button } from "UnityEngine.UI";

export default class GameController extends MonoBehaviour {
    public uiCanvasControllerInput: UICanvasControllerInput;
    public playerManager: NetworkPlayerManager;
    public terrainCollider: Collider;

    public itemManager: NetworkItemManager;

    public spawnFollowerButton: Button;
    public deleteFollowerButton: Button;

    private localPlayer: NetworkPlayer;
    private localItem: NetworkWorldItem;

    private Awake() : void {
        this.playerManager.OnLocalPlayerCreated.AddListener(this.OnLocalPlayerLoaded);
        this.playerManager.OnRemotePlayerCreated.AddListener(this.OnRemotePlayerCreated);
        this.playerManager.OnRemotePlayerUpdated.AddListener(this.OnRemotePlayerUpdated);

        this.spawnFollowerButton.onClick.AddListener(this.SpawnItem);
        this.deleteFollowerButton.onClick.AddListener(this.DeleteItem);
    }

    private OnLocalPlayerLoaded(player: NetworkPlayer): void {
        this.localPlayer = player;
        Camera.main.transform.parent = player.transform;
        this.uiCanvasControllerInput.starterAssetsInputs = player.GetComponent<StarterAssetsInputs>();
    }

    private OnRemotePlayerCreated(player: NetworkPlayer) {
        // Adjust the Y position on entry to make sure players don't fall through the terrain
        let entryPoint = player.User.AOIEntryPoint.ToVector3();
        let adjustedY: float = this.GetTerrainHeight(entryPoint);
        let newEntryPoint: Vec3D = new Vec3D(entryPoint.x, adjustedY, entryPoint.z);
        player.User.AOIEntryPoint = newEntryPoint;
    }

    private OnRemotePlayerUpdated(player: NetworkPlayer) {
        let transformController = player.GetBehaviour<PlayerNetworkTransform>();
        let remoteTransformController: RemoteTransformController = transformController.RemoteController;
        let position = remoteTransformController.TargetPosition;
        // Adjust the Y position on update to make sure players don't fall through the terrain
        position.y = this.GetTerrainHeight(position);
        remoteTransformController.SetPosition(position, true);
    }

    private GetTerrainHeight(position: Vector3): float {
        const maxHeight: float = 10;
        const currentPositionY: float = position.y;
        position.y = maxHeight;
        const ray: Ray = new Ray(position, Vector3.down);
        let result = Utility.Raycast(this.terrainCollider, ray, 2.0 * maxHeight);
        if (result.Success) {
            return result.Hit.point.y;
        } else {
            return currentPositionY;
        }
    }

    private async SpawnItem(): Promise<void> {
        if (this.localItem != null) return;

        this.localItem = await this.itemManager.SpawnLocalItem("", "cube", null, ItemControlType.Mixed) as NetworkWorldItem;
        let itemController : CubeController = this.localItem.GameObject.GetComponent<CubeController>();
        itemController.SetTarget(this.localPlayer.transform, 3, 0.5);
    }

    private async DeleteItem(): Promise<void> {
        if (this.localItem == null) return;

        this.localItem.DoNotDestroyGameObjectOnDestroy = true;
        await this.itemManager.DeleteLocalItem(this.localItem);
        GameObject.Destroy(this.localItem.GameObject);
        this.localItem = null;
    }
}
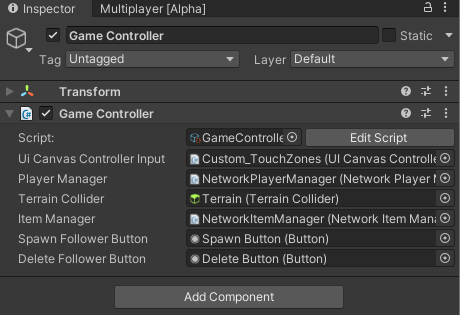
Reference the New Properties
Select the Game Controller object and open the Inspector window. Set the following references:
- Set a reference to the NetworkItemManager object
- Set a reference to the Spawn Button object
- Set a reference to the Delete Button object
Test the Project
Enter Play mode. The item should spawn, follow the player, and delete accordingly.
There is a bug with the Delete button not working the first time. Exit and reenter Play mode to fix the Delete button.
Create a Server Module
The last step is to create a server module that communicates with all clients if a client collides with an cube.
Create the Server Module
In the Project window, right click and select GENIES > Create Scripts > Create Genies Script and name it ServerModule.
Move Server Module
Open the new script in VS Code. In the Explorer menu, move the ServerModule.ts file to the Server > src > Examples folder within your main Unity project directory.
This Server folder is outside the Assets folder so it cannot be seen inside Unity's Project window.
Add the Server Code
The server module is listening for a cube_collision event that the client will trigger with the cube's ID. The script will then relay that message to all clients by triggering the on_cube_update event.
Type the following code into the ServerModule.ts script:
type SFSUser = SFS2X.Entities.SFSUser;
type BaseEvent = SFS2X.BaseEvent;

import { BaseModule } from "Core/Modules/BaseModule";

export class ServerModule extends BaseModule {
    public name: string = "ServerModule";
    private _usersJoined: SFSUser[] = [];

    public constructor() {
        super();
        trace(`Server Module is created!`);
    }

    public init(modules: any): void {
        //Adding listener method to event
        addRequestHandler("cube_collision", this.onCubeCollision.bind(this));

        trace(`Server Module is initialized!`);
    }

    public destroy(): void {
        trace(`Server Module is destroyed!`);
    }

    public onUserJoined(event: BaseEvent): void {
        var user = event.getParameter(SFSEventParam.USER);
        this._usersJoined.push(user);
        trace(`User joined: ${user.name} total users: ${this._usersJoined.length}`);
    }

     public onUserDisconnected(event: BaseEvent): void {
        try {
            var user = event.getParameter(SFSEventParam.USER);
            this._usersJoined = this._usersJoined.filter(u => u !== user);
            trace(`User disconnected: ${user.name} total users: ${this._usersJoined.length}`);
        } catch (error) {
            trace(`[delayStart] Error: ${error} | ${error.stack}`);
        }
    }

     private onCubeCollision(params: any, user: SFSUser) {
        trace(`Sending clients OnCubeUpdate for cube ID: ${params.GetInt("cubeID")} and isColliding: ${params.GetBool("isColliding")}`);
        //Trigger event for all clients
        send("on_cube_update", params, this._usersJoined);
     }
}
Reference the Module
Open the ServerConfig.json file from the Assets > Experience > Server folder.
Edit the script to include the server module:
{
  "v": 1,
  "sdkVersion": "0.0.4",
  "playerEnabled": true,
  "itemsEnabled": true,
  "inventoryEnabled": true,
  "rewardsEnabled": true,
  "storeEnabled": true,
  "modules": [
    {
      "modulePath": "Examples/ServerModule.js",
      "className": "ServerModule"
    }
  ]
}
The sdkVersion property should be the most up to date version available.
Update the Game Controller
The GameController script uses the NetworkItemManager to track all the remote items spawned and uses the NetworkEventManager to communicate with the server.
Open the GameController script and add the highlighted code:
import { Camera, Collider, Color, GameObject, MeshRenderer, MonoBehaviour, Ray, Vector3 } from "UnityEngine";
import { NetworkEventManager, NetworkItemManager, NetworkPlayerManager, Utility } from "Genies.Multiplayer";
import { NetworkPlayer, PlayerNetworkTransform } from "Genies.Multiplayer.Player";
import { SFSObject, Vec3D } from "Sfs2X.Entities.Data";
import { RemoteTransformController } from "Genies.Multiplayer.Sync";
import {StarterAssetsInputs, UICanvasControllerInput} from "StarterAssets";
import { ItemControlType, NetworkWorldItem, NetworkItem } from "Genies.Multiplayer.Item";
import CubeController from "./CubeController";
import { Button } from "UnityEngine.UI";

export default class GameController extends MonoBehaviour {
    public uiCanvasControllerInput: UICanvasControllerInput;
    public playerManager: NetworkPlayerManager;
    public terrainCollider: Collider;

    public itemManager: NetworkItemManager;
    public eventManager: NetworkEventManager;

    public spawnFollowerButton: Button;
    public deleteFollowerButton: Button;

    private localPlayer: NetworkPlayer;
    private localItem: NetworkWorldItem;

    private remoteItems: NetworkWorldItem[] = [];

    public static Instance: GameController;

    private Awake() : void {
        if(GameController.Instance == null) {
            GameController.Instance = this;
        }

        this.itemManager.OnRemoteItemAdded.AddListener(this.OnRemoteItemAdded);
        this.itemManager.OnRemoteItemRemoved.AddListener(this.OnRemoteItemRemoved);

        this.playerManager.OnLocalPlayerCreated.AddListener(this.OnLocalPlayerLoaded);
        this.playerManager.OnRemotePlayerCreated.AddListener(this.OnRemotePlayerCreated);
        this.playerManager.OnRemotePlayerUpdated.AddListener(this.OnRemotePlayerUpdated);

        this.spawnFollowerButton.onClick.AddListener(this.SpawnItem);
        this.deleteFollowerButton.onClick.AddListener(this.DeleteItem);
    }

    private OnRemoteItemAdded(item: NetworkItem) {
        this.remoteItems.push(item as NetworkWorldItem);
    }

    private OnRemoteItemRemoved(item: NetworkItem) {
        this.remoteItems = this.remoteItems.filter(i => i as NetworkWorldItem != item);
    }

    public TriggerCubeCollision(cube: GameObject, isColliding: bool) {
        for(let item of this.remoteItems) {
            if (item.GameObject == cube) {
                console.log("Sending server CubeCollision for cube id: ", item.Id.toString(), " and isColliding: ", isColliding);
                let outParams = new SFSObject();
                outParams.PutInt("cubeID", item.Id);
                outParams.PutBool("isColliding", isColliding);
                this.eventManager.SendServerRequestAsync("cube_collision", outParams);
            }
        }
    }

    private OnCubeServerUpdate(command: string, data: SFSObject) {
        for(let item of this.remoteItems) {
            if (item.Id == data.GetInt("cubeID")) {
                console.log("Updating cube id: ", item.Id.toString());
                let color: Color = data.GetBool("isColliding") ? Color.red : Color.yellow;
                item.GameObject.GetComponent<MeshRenderer>().material.color = color;
            }
        }
    }

    private OnLocalPlayerLoaded(player: NetworkPlayer): void {
        this.localPlayer = player;
        Camera.main.transform.parent = player.transform;
        this.uiCanvasControllerInput.starterAssetsInputs = player.GetComponent<StarterAssetsInputs>();
    }

    private OnRemotePlayerCreated(player: NetworkPlayer) {
        // Adjust the Y position on entry to make sure players don't fall through the terrain
        let entryPoint = player.User.AOIEntryPoint.ToVector3();
        let adjustedY: float = this.GetTerrainHeight(entryPoint);
        let newEntryPoint: Vec3D = new Vec3D(entryPoint.x, adjustedY, entryPoint.z);
        player.User.AOIEntryPoint = newEntryPoint;
    }

    private OnRemotePlayerUpdated(player: NetworkPlayer) {
        let transformController = player.GetBehaviour<PlayerNetworkTransform>();
        let remoteTransformController: RemoteTransformController = transformController.RemoteController;
        let position = remoteTransformController.TargetPosition;
        // Adjust the Y position on update to make sure players don't fall through the terrain
        position.y = this.GetTerrainHeight(position);
        remoteTransformController.SetPosition(position, true);
    }

    private GetTerrainHeight(position: Vector3): float {
        const maxHeight: float = 10;
        const currentPositionY: float = position.y;
        position.y = maxHeight;
        const ray: Ray = new Ray(position, Vector3.down);
        let result = Utility.Raycast(this.terrainCollider, ray, 2.0 * maxHeight);
        if (result.Success) {
            return result.Hit.point.y;
        } else {
            return currentPositionY;
        }
    }

    private async SpawnItem(): Promise<void> {
        if (this.localItem != null) return;

        this.localItem = await this.itemManager.SpawnLocalItem("", "cube", null, ItemControlType.Mixed) as NetworkWorldItem;
        let itemController : CubeController = this.localItem.GameObject.GetComponent<CubeController>();
        itemController.SetTarget(this.localPlayer.transform, 3, 0.5);
    }

    private async DeleteItem(): Promise<void> {
        if (this.localItem == null) return;

        this.localItem.DoNotDestroyGameObjectOnDestroy = true;
        await this.itemManager.DeleteLocalItem(this.localItem);
        GameObject.Destroy(this.localItem.GameObject);
        this.localItem = null;
    }
}
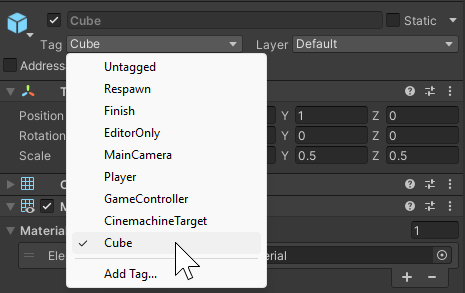
Add the Cube Tag
Select the Cube prefab in your Project window and then open the Inspector window. Add the Cube tag and set it to the Cube prefab.
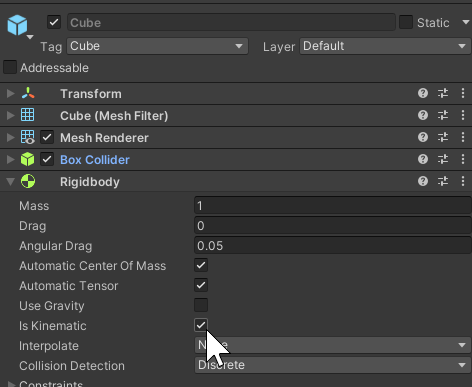
Add a Cube Rigidbody
In order for the player and cube to trigger collision events, one of them needs a Rigidbody component. Add a Rigidbody component to the Cube prefab.
Then deactivate the Use Gravity property and activate the Is Kinematic property. This allows the CubeController script full movement control.
Create a Player Controller Script
The player needs a script to check for collision with a cube and trigger the GameController methods.
In the Project window, right click in the Assets > Experience folder and select GENIES > Scripts > Create Genies Behaviour Script. Rename the script to PlayerController.
Open the PlayerController script and add this code:
import { MonoBehaviour, Collider } from "UnityEngine";
import GameController from "./GameController";

export default class PlayerController extends MonoBehaviour {

    private gameController: GameController;

    Start() {
        this.gameController = GameController.Instance;
    }

    private OnTriggerEnter(other: Collider) {
        if(other.gameObject.tag == "Cube") {
            this.gameController.TriggerCubeCollision(other.gameObject, true);
        }
    }

    private OnTriggerExit(other: Collider) {
        if(other.gameObject.tag == "Cube") {
            this.gameController.TriggerCubeCollision(other.gameObject, false);
        }
    }
}
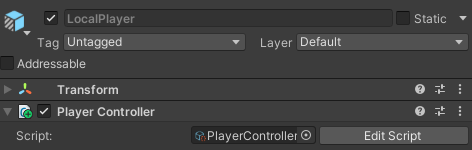
Add Script to Local Player
Select the LocalPlayer prefab and open the Inspector window. Drag and drop the PlayerController script as a component.
Test the Project
Enter Play mode for at least two clients. The local cube detect collision with a remote player and update the color on all clients.