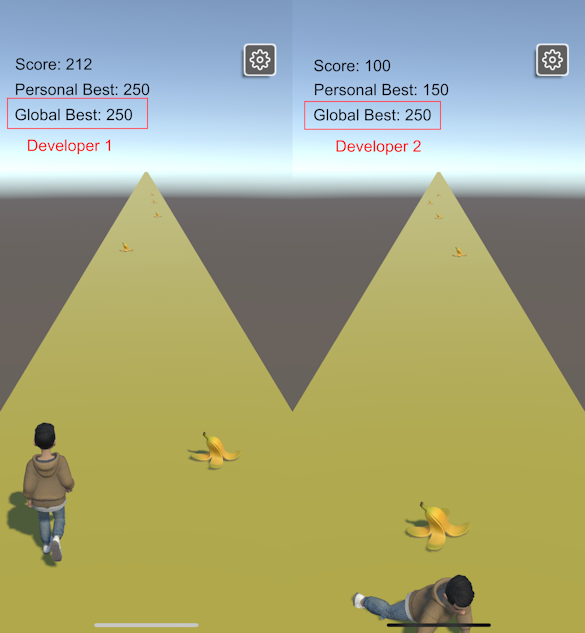
Creating a Canvas Controller
The UI Canvas is the last game development needed for waiting while the Avatar loads, displaying the scores, and letting the user replay the game once they lost.
There will also be two types of high scores:
- Personal High Score: The top high score that the local user has achieved.
- Global High Score: The top high score that any player has achieved.
The two high scores will be stored using Cloud Save for persistent data.
Create the UI Elements
There will be three UI Panels for a loading screen, score display, and game over screen.
The score UI will always be displayed on top of all other UI.
Scale the Canvas
Create a new UI Canvas object which should also add a EventSystem object. Select the Canvas object and open the Inspector. Set the UI Scale Mode property to Scale With Screen Size and set the Reference Resolution property to X: 1080 and Y: 1920.
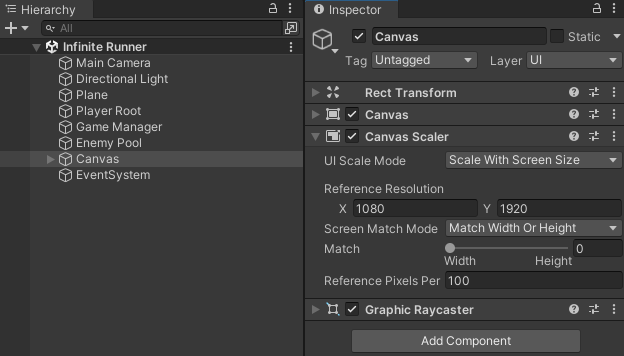
Set the Reference Resolution to whatever mobile device screen dimensions you will be testing on. A quick search on the internet can find those exact dimensions.
Create a Game Over Screen
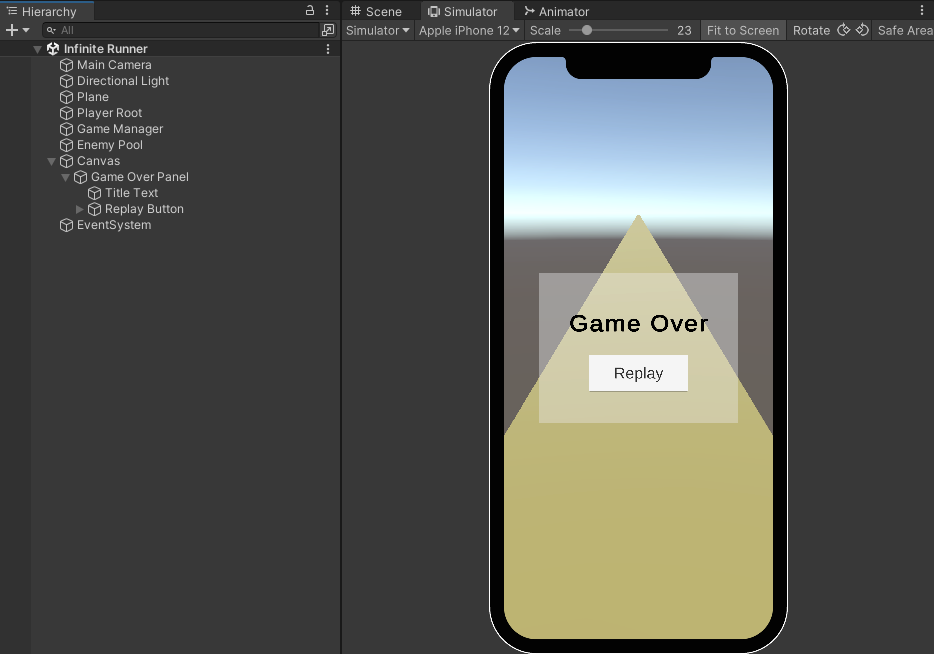
Create a child UI Panel in the Canvas and rename it Game Over Panel. Make sure to add a new UI Button to the panel named Replay Button. Add any other desired UI modifications for the game over screen.
Create a Loading Screen
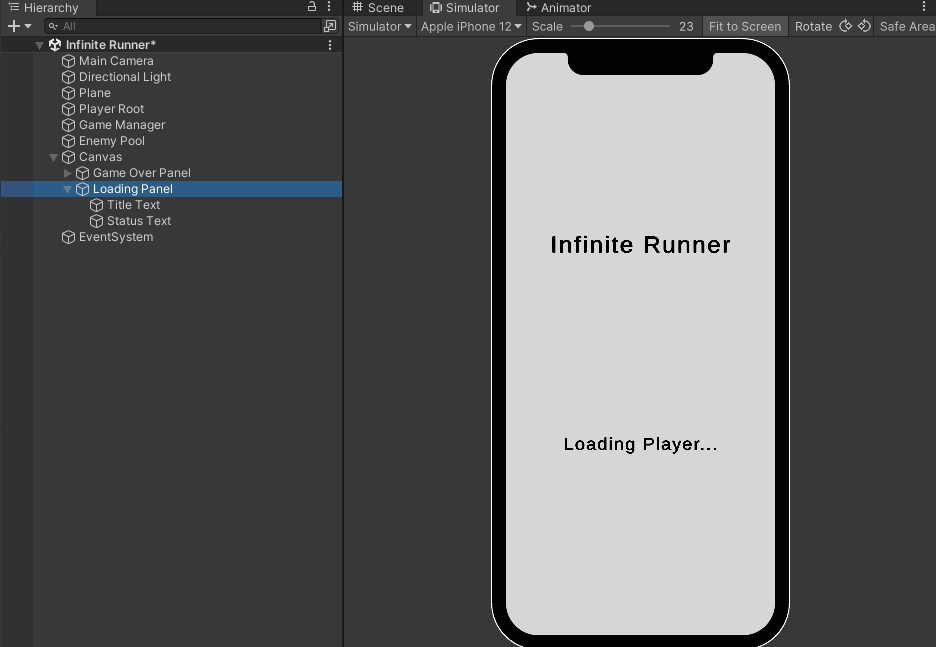
Create a child UI Panel in the Canvas and rename it Loading Panel. Make sure it is ordered second below the Game Over Panel so it is displayed on top. Add any desired UI modifications for the loading screen.
Create a Score Display
Create a child UI Panel in the Canvas and rename it Score Panel. Make sure it is ordered third below the Loading Panel so it is displayed on top.
Add three Text - TextMeshPro objects to the panel and name them:
Score TextPersonal High Score TextGlobal High Score Text
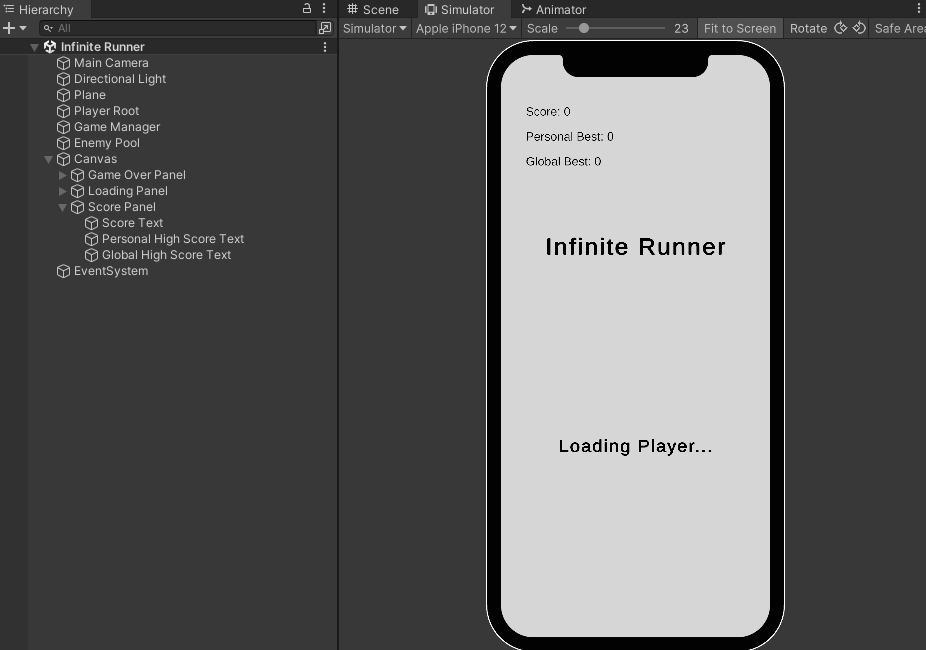
Create the Canvas Controller
The Canvas Controller will manage the following:
- Display the correct panels based on the current
GameState. - Track and update the three different scores.
- Reset the game if the Replay Button is pressed.
Create a Genies Behaviour Script
In the Project window, right click in the Assets > Experience folder and select GENIES > Create Scripts > Create Genies Behaviour Script. Rename the script to CanvasController.
Add the Code
Double click the CanvasController script to open the file in VS Code.
Replace the code with this:
import { Coroutine, GameObject, MonoBehaviour, WaitForSeconds } from "UnityEngine";
import { CloudSaveStorage } from "Genies.Experience.CloudSave";
import { Button } from "UnityEngine.UI";
import { TMP_Text } from "TMPro";
import GameManager, { GameState } from "./GameManager";

export default class CanvasController extends MonoBehaviour {

    @Header("UI Object References")
    @SerializeField private gameOverPanel: GameObject;
    @SerializeField private replayButton: Button;
    @SerializeField private loadingPanel: GameObject;
    @SerializeField private scorePanel: GameObject;
    @SerializeField private scoreText: TMP_Text;
    @SerializeField private personalHighScoreText: TMP_Text;
    @SerializeField private globalHighScoreText: TMP_Text;

    private score: float = 0;

    private personalStorageKey: string = "PersonalStorageKey";
    private globalStorageKey: string = "GlobalStorageKey";
    private floatHighScoreKey: string = "FloatHighScoreKey";

    private personalString: string = "Personal Best: ";
    private globalString: string = "Global Best: ";

    private personalStorage: CloudSaveStorage;
    private globalStorage: CloudSaveStorage;

    private gameManager: GameManager;

    /** This coroutine will increase and update the score over time. */
    private coroutine: Coroutine;

    Start() {
        //Get GameManager singleton and add a listener to OnGameStateChange event
        this.gameManager = GameManager.Instance;
        this.gameManager.OnGameStateChange.addListener(this.CheckGameState);
        //Add a listener to the ReplayButton click event
        this.replayButton.onClick.AddListener(this.OnReplay);
        //Initialize both high scores
        this.InitializeHighScores();
    }

    /** Manages the enemy logic when the game state changes. @param newState */
    private CheckGameState(newState: GameState) {
        switch(newState) {
            case GameState.LOADING:
                this.OnLoading();
                break;
            case GameState.GAME_PLAY:
                this.OnGamePlay();
                break;
            case GameState.GAME_OVER:
                this.OnGameOver();
                break;
        }
    }

    /** This will manage the canvas once the Avatar is loading. */
    private OnLoading() {
        this.scorePanel.SetActive(true);
        this.gameOverPanel.SetActive(false);
        this.loadingPanel.SetActive(true);
    }

    /** This will manage the canvas once the game starts. */
    private OnGamePlay() {
        this.gameOverPanel.SetActive(false);
        this.loadingPanel.SetActive(false);
        this.score = 0;
        this.coroutine = this.StartCoroutine(this.StartScore());
    }

    /** This will manage the canvas once the game ends. */
    private OnGameOver() {
        this.gameOverPanel.SetActive(true);
        this.loadingPanel.SetActive(false);
        this.CheckHighScore(this.personalStorage, this.personalHighScoreText, this.personalString);
        this.CheckHighScore(this.globalStorage, this.globalHighScoreText, this.globalString);
        if(this.coroutine) {
            this.StopCoroutine(this.coroutine);
        }
    }

    /** Set the game state back to replay the game. */
    private OnReplay() {
        this.gameManager.ChangeGameState(GameState.GAME_PLAY);
    }

    /** Initialize and load both the personal and global high scores. */
    private InitializeHighScores() {
        //Initialize Personal High Score
        this.personalStorage = new CloudSaveStorage(this.personalStorageKey, false);
        this.LoadHighScore(this.personalStorage, this.personalHighScoreText, this.personalString);
        //Initialize Global High Score
        this.globalStorage = new CloudSaveStorage(this.globalStorageKey, true);
        this.LoadHighScore(this.globalStorage, this.globalHighScoreText, this.globalString);
    }

    /** This coroutine will increase and update the score every hundredths of a second. */
    private *StartScore() {
        while(true) {
            this.score += 1;
            this.scoreText.text = "Score " + this.score;
            yield new WaitForSeconds(0.01);
        }
    }

    /**
     * This loads a high score from storage and then displays it to a text object.
     * * It will also create a new stored high score if it does not find a stored one.
     * @param storage the CloudSaveStorage to load from
     * @param textObj  the text object to change the text
     * @param highScoreString the leading string to prepend to the text
     */
    private async LoadHighScore(storage: CloudSaveStorage, textObj: TMP_Text, highScoreString: string) {
        await storage.Load();
        if (storage.Has(this.floatHighScoreKey)) {
            let highScore = storage.GetFloat(this.floatHighScoreKey);
            textObj.text = highScoreString + highScore.toString();
        }else{
            storage.SetFloat(this.floatHighScoreKey, 0);
            textObj.text = highScoreString + "0";
            await storage.Save();
        }
    }

    /**
     * This checks if a stored high score is less than the current score.
     * * If it is, then the high score is updated in storage and text.
     * @param storage the CloudSaveStorage storing the high score
     * @param textObj the high score text object
     * @param highScoreString the leading string to prepend to the text
     */
    private async CheckHighScore(storage: CloudSaveStorage, textObj: TMP_Text, highScoreString: string) {
        await storage.Load();
        if (storage.Has(this.floatHighScoreKey)) {
            let highScore = storage.GetFloat(this.floatHighScoreKey);
            if(this.score > highScore) {
                storage.SetFloat(this.floatHighScoreKey, this.score);
                textObj.text = highScoreString + this.score.toString();
                await storage.Save();
            }
        }
    }
}
Cloud Save is a framework that allows developers to save and load data that persists across multiple sessions. It has the option of being private or shared data but each storage is unique among Experiences.
//Create a Cloud Save storage reference
let isShared = false;
let storage  = new CloudSaveStorage("privateStorage", isShared);
//Load the storage data
await storage.Load();
//Check if the data has a certain key
if (storage.Has("stringKey")) {
    //If so, get the key value and print
    let stringValue = storage.GetString("stringKey");
    console.log(stringValue);
}else {
    //If not, set the key value and save to storage
    storage.SetString("stringKey", "Hello World");
    await storage.Save();
}
Check out the Cloud Save page for more information.
Add the Canvas Controller
Select the Canvas game object and open the Inspector window. Drag the CanvasController script to add it as a component.
Then add the following reference properties:
- Game Over Panel
- Replay Button
- Loading Panel
- Score Panel
- Score Text
- Personal High Score Text
- Global High Score Text
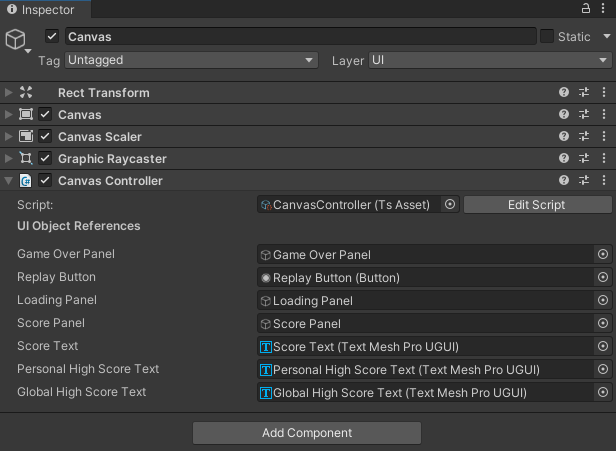
Test the Project
Press the Play button. The UI should display the score at all times. The personal high score should be persistent across multiple game plays. The loading and game over screen should appear as intended. The replay button should restart the game.
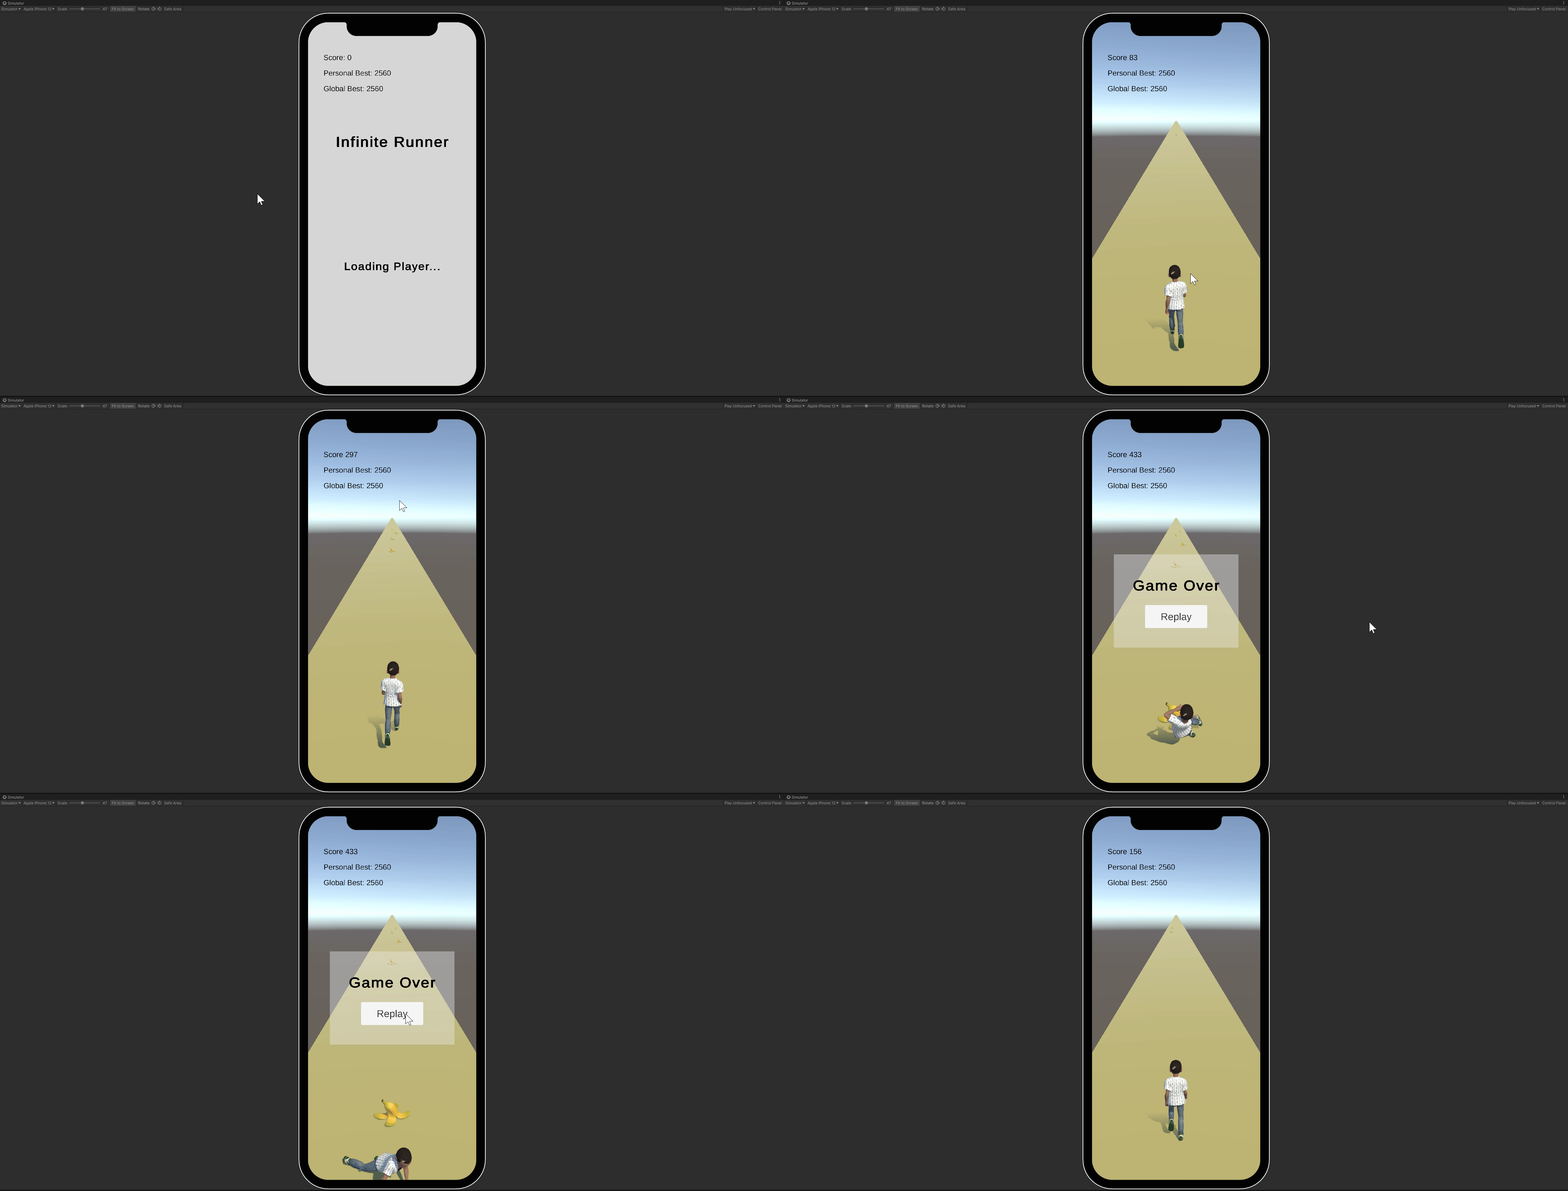
Test with Other Players
The last thing needed to be tested is the Global High Score which requires another player to test the game and see if your high score appears for them. This last section will demonstrate how to upload the Experience to the mobile app and send a link for other players to test your game.
Create Experience in Workshop
Log into the Workshop Portal page with the phone number associated with your Genies account. Click the Experience section on the left side and then click the Create button at the top right.

Add the Experience Info
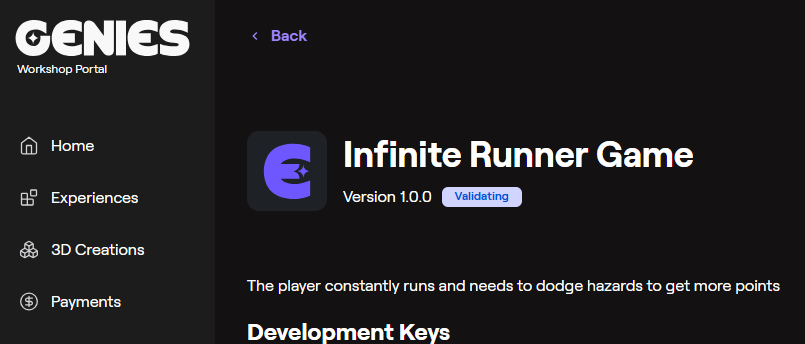
Give the Experience a title and description and click Save. The Experience page should appear with the development keys.
Link the Account
Open the Project Settings window by pressing the top dropdown menu option Edit > Project Settings. Open the dropdown menu for Select Experience and select the Experience created in the Workshop Portal. Then press Link.
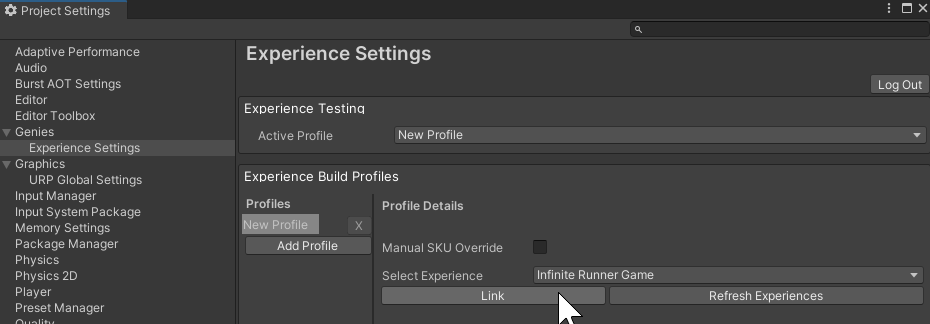
You may need to sign in with your Genies account phone number and setup the Experience before linking the account if you haven't done so before.
Checkout the Quickstart page for more information.
Build the Experience
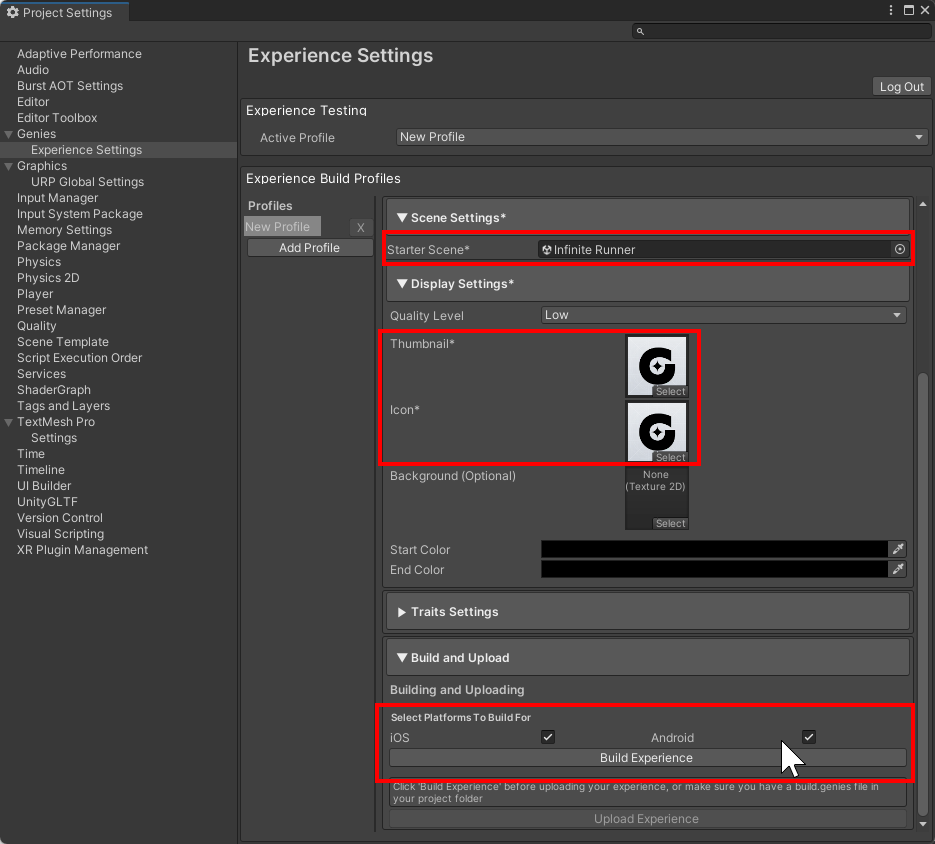
Once the Experience is linked, add the scene to the Starter Scene property. Then add a small icon image to the Thumbnail and Icon property. Then press the Build Experience button at the bottom.
Upload the Experience
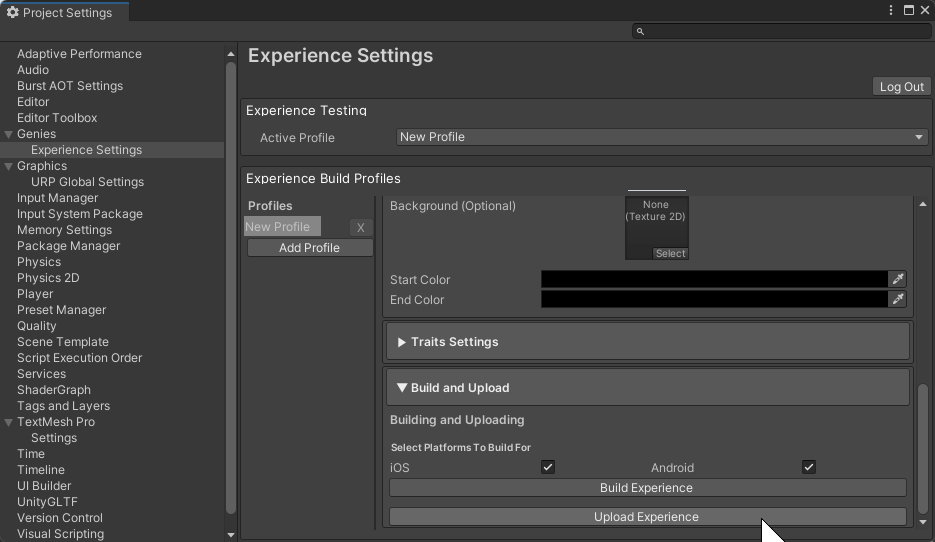
Once the Experience is built, click the Upload Experience button at the bottom.
Share the QR Code
Once the Experience is uploaded, there should be a window that appears to confirm it was successful. The window will show a QR Code and have a link that can be shared to other developers. This will open the Experience on the Genies app.
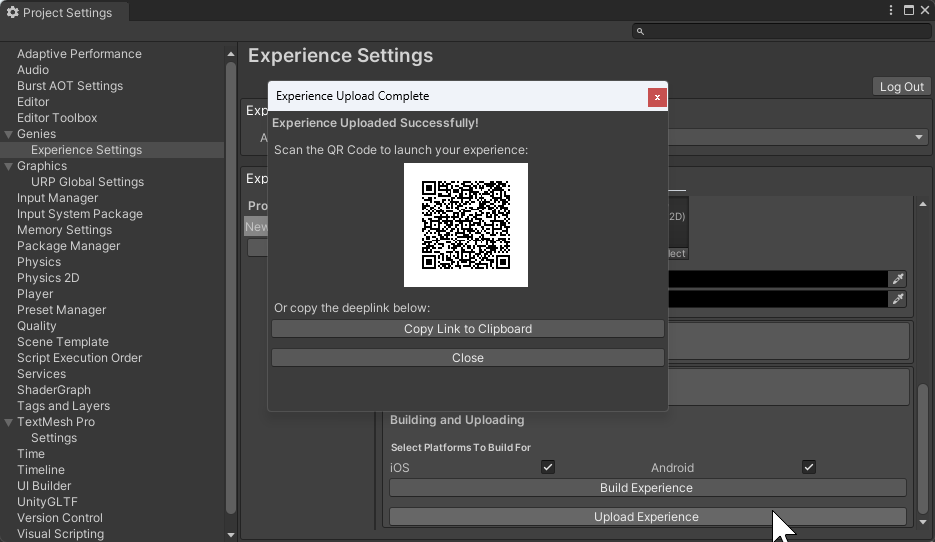
Developers looking to test their Experiences on the Genies app will need a specific version of the app using TestFlight. Reach out in the Discord if you need access.
Test the Link
Click the link and play your game on the Genies app. Check with other developers to see if their Personal High Score and Global High Score is correct for all developers.
